Adding an Operating Mode
You can adjust the operating mode instructions used during the survey to get a better result from the computation. You can add multiple operating mode instructions with no limitation in the number of modes. For each operating mode instruction, you can define:
|
●
|
Live (default mode): this mode is the one used during acquisition; it consists in the replay of the instructions defined by the user during the survey. To know how a sensor was configured in live, you can look at its status from the “INS real-time navigation” channel. For instance, if you want to see how the GPS1 was setup, you can drag and drop the “GPS1 data received”, “GPS1 data valid” and “GPS1 data rejected” into the display pane. If at a same time a measurement from GPS1 is received and either valid or rejected, that means the GPS1 was set to ON. If it is received without being valid nor rejected, it was set to off. |
|
●
|
Off: data from the aiding sensor is always rejected by the Kalman filter (as if the aiding sensor is off) |
|
●
|
On: whenever a new data from the aiding sensor is received, its value is compared to the estimate of the INS. Data goes through the filter if the difference is below the following value: |
 .
.
where: StdINS: standard deviation of the estimate of the INS. StdAidingssr: standard deviation of the data from the aiding sensor.
Otherwise, data is rejected.
|
●
|
Forced: data from the sensor is always accepted, without any validity check from the Kalman filter |
It is not recommended to use the Forced mode because it can degrade data merging done by the Kalman filter.
|
>
|
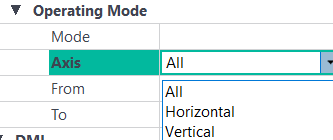
Axis: defines the GPS data to be selected: |
|
●
|
All: all data (latitude, longitude, altitude) |
|
●
|
Horizontal: latitude, longitude |
Some aiding sensors deliver only one data from a Kalman point of view while other aiding sensors deliver several data (e.g. the GPS aiding sensor delivers the horizontal position and the vertical position). The axis parameter is used to differentiate this data type; the operating mode instruction is applied on all axes or on a specific axis (e.g. the horizontal axis for the GPS).
|
>
|
From/To: Period of validity (time of beginning and time of end) |
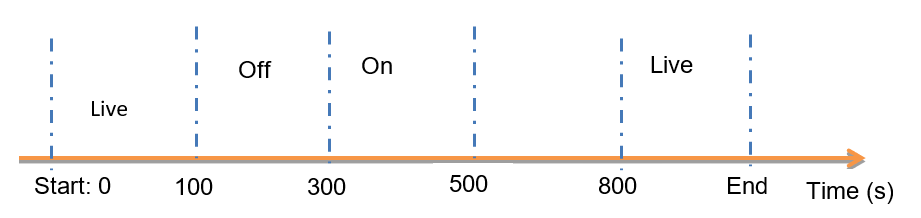
See the following example: suppose you want to setup the operating mode as follows:
|
>
|
Undefined from 500 to 800 |
|
>
|
Live from 800 to no value (the end of file) |
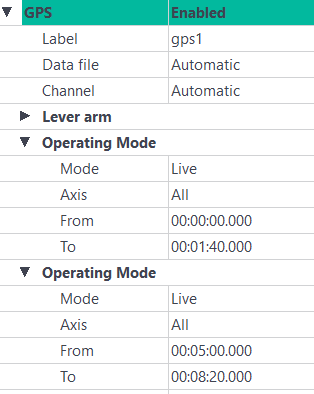
Example of Operating mode: From/To parameters
|
1.
|
In the Processing panel, right click on the GPS parameter and select Add Operating mode. The Operating mode parameters are displayed. |
|
2.
|
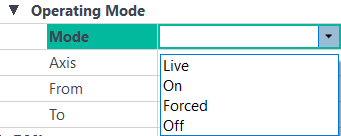
In the GPS - Operating mode, click on the right of the Mode field. A pull-down menu is displayed. |
|
3.
|
Select Live in the pull-down menu. |
|
4.
|
Click on the right of the Axis field. A pull-down menu is displayed. |
|
5.
|
Select a value (All, Horizontal, Vertical) in the pull-down menu. |
|
6.
|
Click on the right of the From and To fields. Enter the corresponding values, e.g. From 00:00:00:000 and To 00:01:40:000. |
|
7.
|
Right click on the GPS parameter and select Add Operating mode. |
|
8.
|
Enter the corresponding values, e.g. From 00:01:40:000 and To 00:05:00:000. |
|
9.
|
Right click on the GPS parameter and select Add Operating mode. |
|
10.
|
Enter the corresponding values, e.g. From 00:01:50:000 and To 00:08:20:000. |
|
11.
|
Right click on the GPS parameter and select Add Operating mode. |
|
12.
|
Enter the corresponding values. The resulting window is displayed: |