Creating a New Project
|

|
Click on the picture to view the procedure
|
|
|
A project contains:
|
>
|
Input file name(s): INS post-processing data, GNSS data, etc. |
|
>
|
Output file name(s): containing results of the post-processing (the file may
be empty while the post-processing has not been executed) |
|
>
|
Configuration data: containing all the settings displayed in the Processing
panel |
When you load a post-processing file into Delph INS Subsea, it consequently asks you to create a project.
| |
|

|
It is strongly recommended not to move the project once it is has been created. Some file links may be broken.
|
|
1.
|
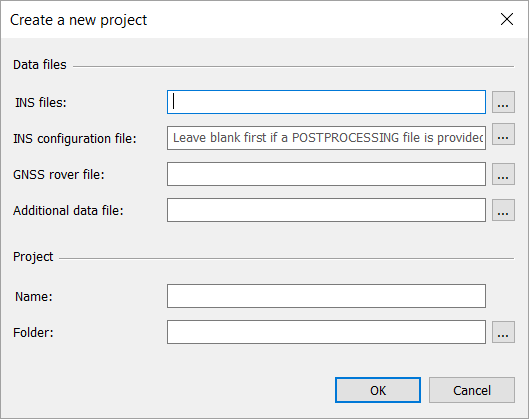
Select  ► New... or click on ► New... or click on in the standard tool bar or [Ctrl+N] on the keyboard. The following dialog box is displayed: in the standard tool bar or [Ctrl+N] on the keyboard. The following dialog box is displayed: |
|
2.
|
Click on  , at the right of INS files (post-processing data file). , at the right of INS files (post-processing data file). |
|
3.
|
Browse and select a file in the dialog box which is displayed in the following formats: |
|
>
|
RAW INS Post processing files (*.log, *.raw, *.p2, *p3) |
|
>
|
INS decoded files (*.txt) |
Note: An INS file is mandatory to create a Delph INS Subsea project.
The post-processing data file name appears in the corresponding field. A default project name (the name of the selected data file) and a default folder appear in the Delph INS Subsea.
|
4.
|
Click on OK button. A dialog box proposes to convert the file to be able to access the data into Delph INS Subsea. |
|
5.
|
If needed, click on at the right of INS configuration file. |
|
6.
|
Select the appropriate INS configuration file (*.-ins.conf.xml) in the dialog box which is displayed. |
The INS configuration file name appears in the corresponding field.
Note 1: This file is optional (when the postpro file is a raw file and not in the case of an *.xpf file) as it already exists in the INS files. You can use this file for a specific need, e.g. to initialize the project with all the INS settings (lever arms, misalignment, etc.).
Note 2: If you entered a *.log file at Step 2, it will be automatically filled in with the decoded configuration file.
|
7.
|
If needed, click on , at the right of GNSS rover file. |
Browse and select a *.sbf or *.ubx or RINEX file in the dialog box which is displayed.
Note: You can create a project without any rover file and add it later.
|
8.
|
If needed, click on , at the right of Additional data file (optional). |
This field allows adding an external data file (GPS, synchronized output,…) when a new project is created from an *.xpf file.
|
9.
|
If the default project name does not suit you, type a new one in the Delph INS Subsea project - Name field. |
|
10.
|
If the default project folder does not suit you, click on at the right of Folder and choose a new folder path. You can also type a new folder path in Delph INS Subsea project – Folder field. |
|
11.
|
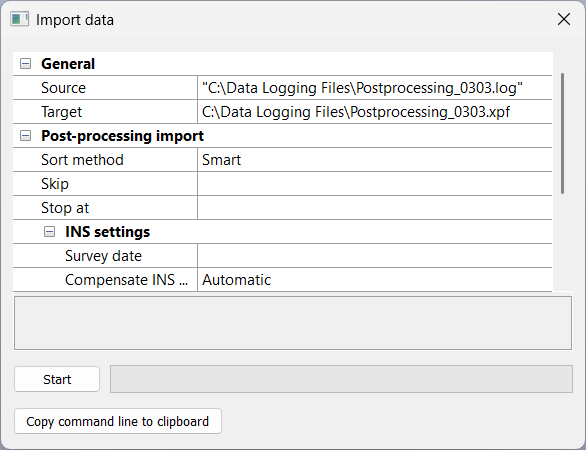
Click on OK button then the Import Data window is displayed: |
The Source field indicates the file(s) containing the data to import.
The Target field indicates the destination file.
|
12.
|
If you have selected several input data files, you have the option to sort them alphabetically or not in the pull-down menu Sort method. It is useful in case of several source files: |
|
>
|
Smart arranges them using the time data within the files |
|
>
|
Alpha sorts the files in alphanumerical order (see below) |
|
>
|
None does not sort the files which are decoded in the order they are found in the command line |
|
13.
|
Click at the right of Skip and type in the number of bytes you want to skip in the raw data file before converting data. |
|
14.
|
Click at the right of Stop at and type in the number of bytes in the raw data file after which you do not want to import data. |
|
15.
|
Click at the right of Survey date (optional). |
Note: If a GNSS is present with your INS, you do not have to enter a date; it is read from the relevant file.
|
16.
|
Click on Compensate INS clock drift and make sure it is True (default value) (in this configuration, the INS receives a hardware synchronization pulse (PPS) from the GNSS). |
|
17.
|
Click on Copy command line to clipboard button in order to save the command line in the clipboard. You can use it later. |
|
18.
|
Click on the Start button to launch the conversion. |
If the output data file already exists, a warning message is displayed before overwriting the existing file. At the end of the conversion the data from the converted file is displayed in the main window.
The *.log file is converted into three different files which are used in the Create a new project window:
|
>
|
*-ins.xpf(for the INS files) |
|
>
|
*-ins.conf.xml(for the INS configuration file) |
|
>
|
*.log.xml(this file is not used in Delph INS Subsea) |
The configuration file is a *.xml file editable using a text editor (Notepad++ is recommended as preferred editing tool). This file shows the system configuration and its potential changes throughout the recording.
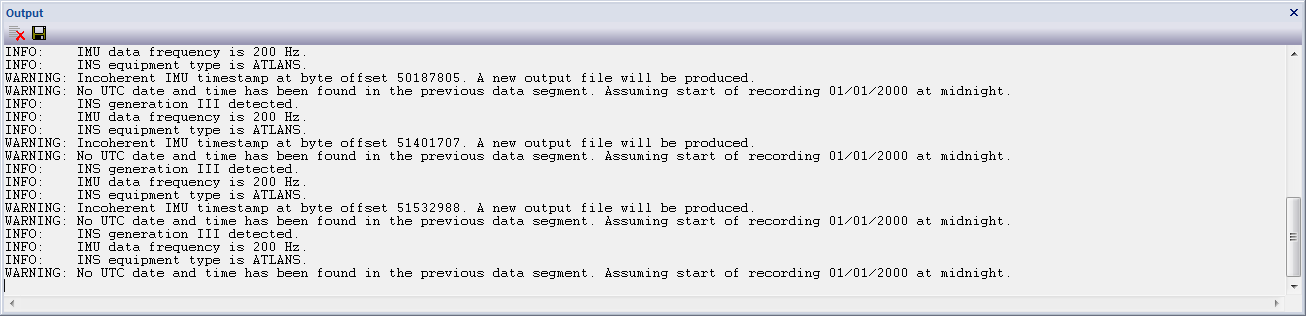
During the conversion process some information is displayed in the Output panel.
When warnings are issued about checksum errors or bad frames, it means that some bytes are corrupted or missing in the files due to problem during the logging.

When there was a problem in the recording, the resulting file can be split into several xpf files.