Downloading Public Base Stations By Using GDT
A public base station can be downloaded by using the GNSS Download Tool in stand-alone version or inside the Delph INS Subsea.
It allows you to download GNSS corrections of a public base station in order to improve the GNSS post-processing. To achieve this, you must select where you want to search for public base stations, and at what time.
GNSS Download Tool
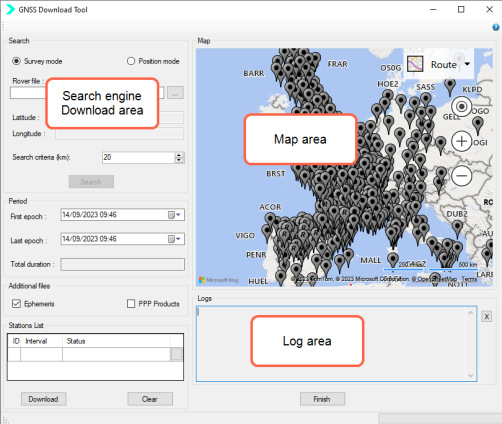
The GDT screen is divided into the following areas:
|
>
|
Search engine/Download area: it allows configuring the base stations to be downloaded according to some geographical and time criteria. It is composed of the following data: |
|
>
|
Logs area: it displays all the results of a download sequence in chronological order. |
The list of world base stations available for downloading is provided with the GDT and all these base stations are automatically displayed on the map area when the GDT is launched.
|
>
|
Map area: it displays all the base stations which have been downloaded and each base station is identified by an icon. When you position your mouse over an icon, a pop-up window displays the reference frame attributes: |
|
●
|
Identification (four characters) |
|
●
|
Coordinate Reference Frame (CRF), e.g. North American Datum (NAD83) |
|
●
|
Geographic position: latitude and longitude |
|
●
|
Interval: refreshing period for base station data in the Rinex file |
Format of the data servers from the GDT/Servers.xml file:
|
>
|
priority (mandatory): The priority attribute is a integer value which indicate the url priority to use |
|
>
|
format (mandatory): The path format to download the station data. The value is the string value. Format specifier should be in curly brackets. |
Available format specifiers are:
|
●
|
yyyy:Year represented by a full four digits |
|
●
|
yy: Year represented only by the last two digits. A leading zero is added for single-digit years |
|
●
|
MM: Month as digits with leading zeros for single-digit months. |
|
●
|
wd: Day of the GPS week number |
|
●
|
dd: Day of the month as digits with leading zeros for single-digit days |
|
●
|
ddd: Abbreviated day of the year |
|
●
|
hh: Hour of the day as digits with leading zeros for single-digit hours |
|
●
|
h: Hour of the day as a letter |
|
●
|
sta: Base station name in lower case |
|
●
|
STA: Base station name in Upper case |
|
>
|
extension (mandatory) : The extension is file type to download. The extension is a string value starting with a dot. It can be left blank. |
Format specifiers can be used for this field.
The different icon types displayed are listed in the table hereafter:
|
Icon
|
Explanation
|
|

|
Search position (L and G) in Position mode
|
|

|
Base station added in Station List
|
|

|
Base station removed from or not selected in Station List
|
|
|
Base station in GLONASS constellation added in Station List
|
|

|
Base station in GLONASS constellation removed from or not selected in Station List
|
|

|
Base station in GPS constellation added in Station List
|
|

|
Base station in GPS constellation removed from or not selected in Station List
|
Downloading a Public Base Station
GNSS Download Tool is launched with the rover file as a parameter from which the dates and trajectory are extracted. At the end of downloading, Delph INS Subsea automatically detects GNSS Download Tool shutdown and starts import of the downloaded data.
The download folder is:
|
>
|
either selected by the user when the GNSS Download Tool is launched in stand-alone mode |
|
>
|
or in the project folder when GNSS Download Tool is launched from Delph INS Subsea. |
|
1.
|
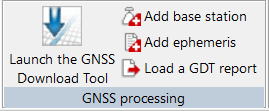
In the Processing parameters tab ► GNSS processing group, click on Launch the GNSS Download Tool. |
Searching in Position mode
|
1.
|
You can search the base stations located around a geographic position you have defined with the Position mode. |
|
>
|
Right click on the map and use the Set Position command to enter automatically the position (latitude and longitude) coordinates. A base station icon (orange color) is displayed. |
|
>
|
In the Period area, use the pull-down menu to enter the First Epoch data. |
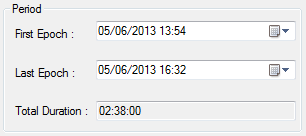
The period is the period of interest for the base stations data download expressed in GNSS time. The date format corresponds to the configuration of your Operating System (OS). The Total Duration is the difference between the Last Epoch and the First Epoch.
|
>
|
In the Period area, use the pull-down menu to enter the Last Epoch data. The Total Duration is automatically displayed. |
|
>
|
Click on the Search button. The engine searches for any base station located in a square of twice the search criteria value, centered on the manual position. The Logs area displays the results of the search. |
|
●
|
To remove one base station; click on  then the color of the base station changes from blue to grey on the map. You can also right click on the base station on the map and use the Remove command to remove a base station. then the color of the base station changes from blue to grey on the map. You can also right click on the base station on the map and use the Remove command to remove a base station. |
|
●
|
To remove all base stations, click on the Clear button |
|
●
|
To start downloading, click on the Download button. When downloading is complete, the Status column is updated with “Success” or “Failed”. |
|
●
|
To stop downloading, click on the Cancel button. |
Searching in survey mode
|
1.
|
You can search the base stations close to a survey trajectory defined in a rover file (*.yy_ for Rinex files) with the Survey mode. The base stations around the trajectory will be displayed in blue color. |
|
>
|
In the Search area, tick Survey Mode. The Rover Path File field is activated. |
|
>
|
In the Rover Path File field, click on  . . |
|
>
|
Select the file (which is the one in the GNSS processing parameters – Rover – Data file in the Processing panel). |
|
>
|
In the Search criteria (km), enter a value. The search area is the search criteria value away from any point of the trajectory. |
|
>
|
In the First Epoch field, use the pull-down menu to enter the date. The period is the period of interest for the base stations data download expressed in GNSS time. The date format corresponds to the configuration of your Operating System (OS). The Total Duration is the difference between the Last Epoch and the First Epoch.
In the Survey Mode the period is extracted from the rover files but you can modify it if necessary.
|
|
>
|
In the Last Epoch field, use the pull-down menu to enter the date. The Total Duration is automatically displayed. |
|
>
|
Click on the Search button. The result of the search process is displayed in the Logs area. The base stations (in blue color) around the orange icon in the defined perimeter are displayed on the map. |
|
>
|
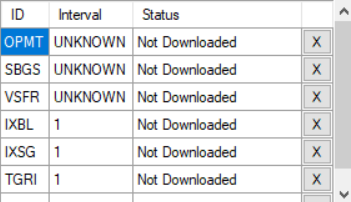
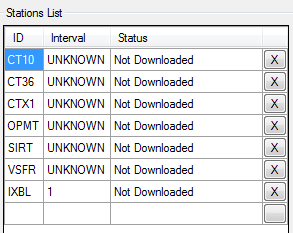
The located base stations are displayed in the Stations List with their respective ID (base station identifier), Interval (refreshing period for base station data in the Rinex file) and Status (download status (e.g. Not downloaded, etc.) data. |
|
2.
|
In the Additional files field (optional), tick the Ephemeris and Clock data. |
|
●
|
To start downloading, click on the Download button. (only if you are using Exail GNSS engine). Ephemeris and Clock are not used with Septentrio GNSS engine. When downloading is complete, the Status column is updated with “Success” or “Failed”. |
|
●
|
To stop downloading, click on the Cancel button. |
|
>
|
In the Map area, select the Road or the Bird’s eye command.
|
Adding base station
|
1.
|
To add specific base station that is not in the list, right click on a base station icon  (grey color). (grey color). |
|
2.
|
Click on the Add base station button then click on the Add menu displayed on the map. The base station icon color changes from grey to blue and the name is added in the Stations List. |
Removing a base station
|
1.
|
Click on the base station icon  (blue color). Then click on the Remove command : the base station is removed from the Stations List and its color changes from blue to grey on the map. (blue color). Then click on the Remove command : the base station is removed from the Stations List and its color changes from blue to grey on the map. |
or click on the color of the base station changes from blue to grey on the map. You can also right click on the base station on the map and use the Remove command to remove a base station.
|
2.
|
To remove all base stations, click on the Clear button. |
Downloading the base stations
|
1.
|
Click on Download button in order to download the public station in the search list. If you have too many stations, you can suppress them either by clicking the X in the stations list or by right-clicking ‘delete’ on the station symbol on the map. |
For each station, all files corresponding to the survey period are downloaded into the project directory and converted to a single file.
|
2.
|
At the end of downloading, click on Finish button. A color code indicates the differences: |
|
>
|
New base stations are in green |
|
>
|
Data which has been modified for the existing base stations are in red (label, position definition mode, latitude, longitude and altitude) |
|
3.
|
Click on OK button. A gdtReport.xml file is created in the download folder at the end of the “Adding a base station” procedure. |
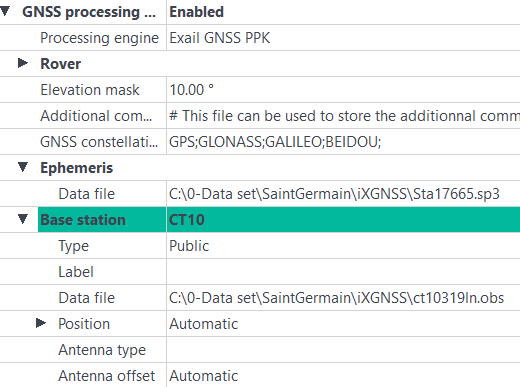
The downloaded data is stored in the Rinex sub-directory (raw files from Internet). The downloaded base station is added to the project with irs information:
Importing a GDT report
|
1.
|
In the Processing parameters tab ► GNSS processing group, click on Load a GDT report. |
|
2.
|
Click at the right of the Base station ‘name’ field. A pull-down menu is displayed with two choices. To import the base station to the project, select Import into the project. |
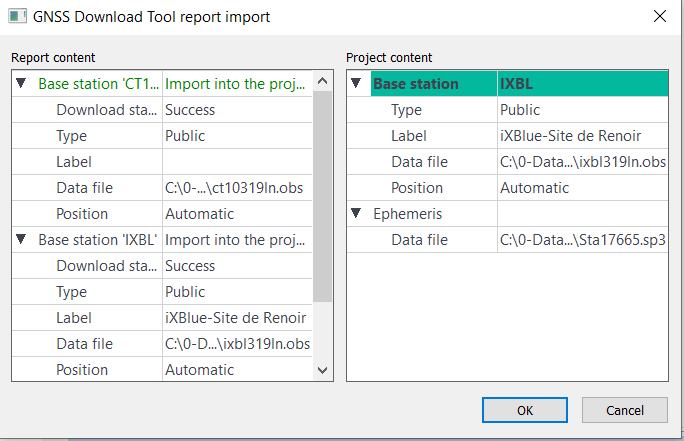
A color code indicates the differences:
|
>
|
New base stations are in green |
|
>
|
Data which has been modified for the existing base stations are in red (label, position definition mode, latitude, longitude and altitude) |
|
3.
|
Click on the OK button. |
The new base stations with the selected “Import into the project” option are added in the project, the modifications on the existing base stations are acknowledged and the base stations which are not in the downloading report are kept in the project.