Range Meter (LBL)
In the Processing panel at left, right click on a parameter and select Add Aiding
Sensor then select range meter. The following instruction is added to the processing panel:
The values displayed in red must be entered.

| 1. | Click besides Label and enter a unique label. A Label is a free text enabling identification of a sensor when different sensors are used. |
| 2. | There are two ways to add a data file in the Variables panel: |
| > | Click on the Add data file button in the ribbon and select the file. |
| > | Right click in the Variables panel, choose Add data File and select the file. |
If the data file is not in XPF file format, a conversion is proposed.
Drag and drop the data file that was added in the Variables panel in the Data File field.
The Data File field references now the path of the selected data file, the Channel field displays the associated channel.
To remove the link to the data file and to display the default Automatic mode in both Data file and Channel fields, right click and select Clear data source.
| 3. | You can choose the beacons id to be taken into account into the processing by clicking on the  next to the Beacon field. The following window is superimposed to the main window: next to the Beacon field. The following window is superimposed to the main window: |
![]()
Select or unselect the beacons to be taken into account.
The beacons id displayed in this window depends on the beacon id decoded in the Output panel. For example:
![]()
Make sure that the beacon id are correctly assigned to the right transponder code.
The rules for decoding range meter beacon are:
| > | when the transponder code is a numerical value (ex. "32") the beacon id is the numerical value "as is". You will have the following message: |
>> INFO the LBL beacon id 32 is assigned to the transponder code '32".
| > | when the transponder code is a numerical value preceded by the letter A, B or C (ex. "B32") the beacon id is the numerical value incremented by 0, 100 or 200 respectively: |
>> INFO the LBL beacon id 43 is assigned to the transponder code 'A43'.
>> INFO the LBL beacon id 128 is assigned to the transponder code 'B28'.
>> INFO the LBL beacon id 208 is assigned to the transponder code 'C08'.
With former POSTPROCESSING protocols the transponder code was not existing and a beacon id (from 1 to 4) was randomly assigned to each datagram. In this case, contactExail CONTACT - SUPPORT for help.
| 4. | You can modify the lever arms of the sensor. This feature helps you to improve the accuracy of your navigation. Three offsets XV1, XV2, XV3 can be set. |
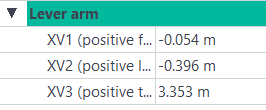
Enter the values of the XV1, XV2 and XV3 in the corresponding fields.

|
You can copy the range meter sensor lever arm values to the primary output lever arm by right-clicking on the Lever arm fields. |
In this window, you can also:
| > | modify the position of the beacon (latitude/longitude/depth). |
| > | add an operating mode, see Adding an Operating Mode |
| > | add an user standard deviation, see Adding a User Standard Deviation |
| > | add minimum standard deviation, see Adding Minimum Standard Deviation |
| > | add maximum standard deviation, see Adding Maximum Standard Deviation |